Few days ago I found an interesting picture in the most fantastic chocolate book I have ever read. It was a white chocolate covered lollipop with lovely flower patterns on its surface. I would not say this kind of treat is my taste really but I was amazed by this clever decoration idea.
I began searching and it turned out quickly it is quite easy to beautify a chocolate dessert like this. All you need is a special transfer sheet with the pattern printed on and chocolate. And some experience in chocolate tempering could be handy too.
So I ordered a sheet of transfer foil and took a well known bonbon recipe I have already used before. Last time when I made bonbons I was not satisfied with the results. As the chocolate shell was too thin I could not take them out from the silicone mold properly. Although the filling was quite good, creamy and soft; the bonbons were not perfect at all.
This time I tried to follow all instructions accurately and I think this trial was going better. I mean as accurately as I can, because tempering normally requires thermometer but I was brave enough and made it without one. What is more, I used a different method to cool the chocolate down than what I normally use.
Ingredients for 16 bonbons:
200 g bittersweet chocolate 70 percent cocoa ( 100 g for tempering and 100 g for the ganache)
150 ml whipping cream
1 tablespoon honey
1 tablespoon butter (it is optional, I did not use)
Tools:
bain-marie, flexible spatula, kitchen thermometer, mold, pipping-bag,
Techniques:
Tempering chocolate
Molding
Making ganache
Tempering chocolate in a bain-marie
This is a procedure when we heat, cool and reheat the chocolate to get a nice shiny surface. Tempered chocolate is ideal for decoration or molding into bonbons. The following method is easier than using tempering stone, which is what I have used so far. It only requires a hot and a cold water bath (with a few ice cubes)
Melt the chopped chocolate slowly in a bain-marie. When the temperature reaches 55°C-58°C remove the bowl from the hot water bath and place it over the cold one.
Stir constantly to avoid the melted chocolate to over-crystallize on the edges of the bowl. When the temperature reaches 35°C, remove from the cold water bath and continue to stir. After the temperature is about 28°C place the bowl over the hot water bath again.
Bittersweet chocolate should reach 31°C-32°C.
Once this temperature is reached remove from the hot water bath and use it immediately.
Molding
Creating perfect, unblemished chocolate shells requires spotless molds. If we really want to follow the professional method, we have to clean them with 90% alcohol beforehand: it is essential to remove any grease from the molds. As this is unlikely to find in an average kitchen, however well equipped, I suggest to clean the molds with washing liquid and using kitchen paper to dry them out properly.
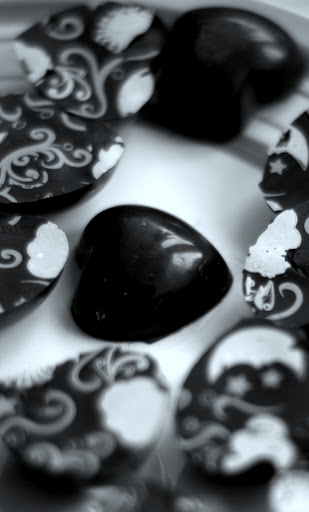
Completely fill the mold with the tempered chocolate to make sure the whole surface is covered by chocolate.
Turn it upside down over the bowl to remove the excess chocolate and place it upside down over a cooling rack.
When the chocolate begins to set, turn the mold over and remove the excess chocolate with a kitchen knife.
Chill right side up for at least 30 minutes.

Whilst cooling you can prepare the ganache (technique explained below), and once the shells are ready fill them with the ganache. Making sure you don’t overfill, leaving about 1mm space for the closing layer of chocolate.
After the ganache has set in the mold you can close the bonbons. For this last step you need tempered chocolate again.
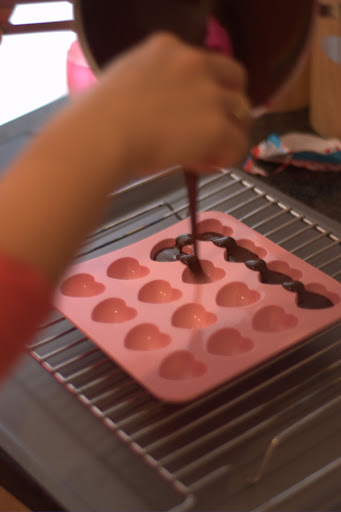
Pour it on the mold, make sure that the chocolate properly covers the bonbons. When the chocolate starts to set use a kitchen knife to remove excess chocolate.
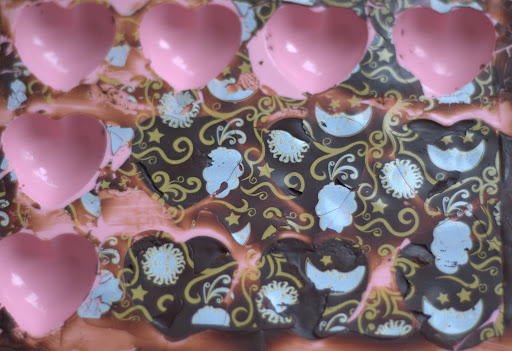
Before the chocolate is set, cover the mold with transfer sheet (printed side down), making sure there are no air bubbles trapped under the sheet. Leave the chocolate to set at room temperature. To speed up the process, you may put it in the refrigerator for 10 minutes, but in that case the crystallization may be too fast and visible so I suggest to wait patiently.
When the chocolate has set properly you can carefully remove the sheet from the surface of the bonbons. The pattern will be transferred from the foil to the bottom of the bonbons.
Making ganache for bonbons
Follow the three-thirds rule to make a chocolate emulsion.
To make an emulsion
The ganache is the mixture of two liquids that do not combine naturally: chocolate and cream, milk or fruit juice. This is a type of emulsion.
To start to make ganache we need bain-marie, a flexible spatula and an electric blender. The best technique to reach a perfect texture is the three thirds rule. It means following steps:
Melt the chocolate using a bain-marie over a hot water bath. Bring the liquid (cream, milk, juice, coffee) to boil in a saucepan.
Pour one-third of the liquid over the melted chocolate and using a spatula mix the liquid into it. Try drawing small circles in the center of the mixture to create a shiny, elastic texture, it is called the kernel.
Incorporate the next one-third of liquid and mix in the same way.
Pour in the last third and still mixing with the circulating movement.
Finally, use an immersion blender to get a perfect, soft, creamy ganache.
This is one of the most important techniques you want to learn to create successful chocolate filling for desserts.
When you make ganache for filling bonbons, you need to modify the basic recipe and add 1 tablespoon honey into the boiling cream before adding it to the chocolate.
As soon as the ganache cooled down to a temperature of abut 35°C-40°C, add the diced butter and use the blender only after this step.
Allow the temperature to cool down to 27°C, spoon it into piping bag and pipe it out into the chilled, chocolate lined molds.
Leave to set for 12 hours and close the mold with tempered chocolate and decorate using the transfer sheet. Chill the bonbons for at least 2 hours before remove them from the mold.

